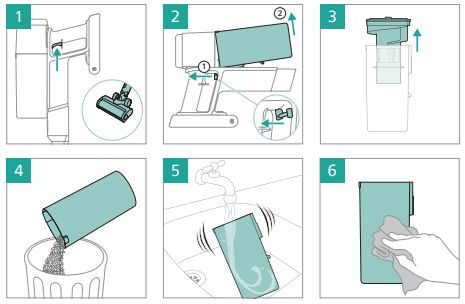
- Turn off the appliance (image 1).
- Remove the bucket by pulling the lever, located on the right side of the power button (image 2).
- Lift the colored part to access the bucket (image 3).
- Empty the dust bucket (image 4).
- To maintain the appliance thoroughly, rinse the dust bucket under the tap. Please, avoid using the dishwasher (image 5).
- Ensure the dust bucket is completely dry (24 hours) before placing it back (image 6).
Philips Support
How to clean my Philips 3000/2000 Series Cordless Vacuum Cleaner
نشرت في 10 October 2024
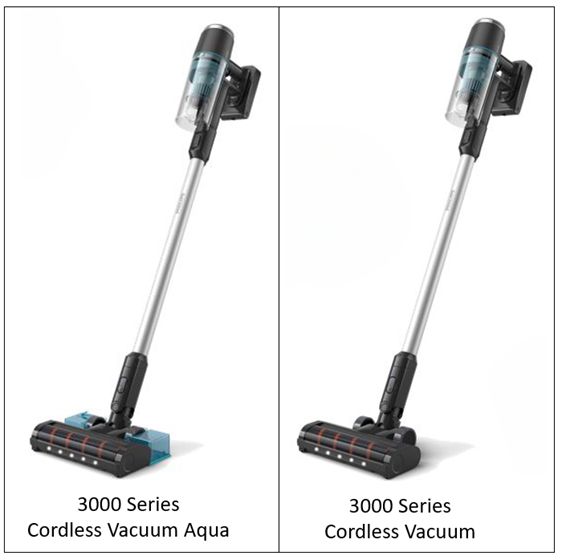
To find out how to clean the dust bucket, filter, brush, and water tank of your Philips 2000/3000 Series Cordless Vacuum Cleaner, check out the sections below. You can find the model name of the stick and/or check the image below.
-
To clean the dust bucket of your Philips Cordless Vacuum Cleaner, follow these simple steps: تشغيل إيقاف مؤقت -
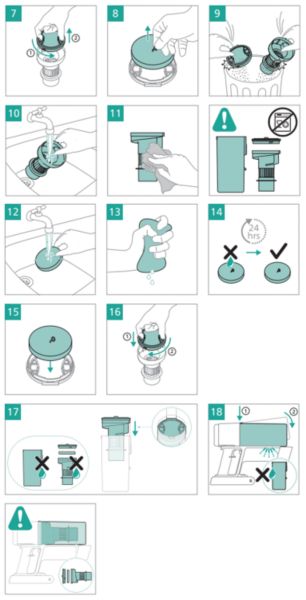
To keep your Philips Cordless Vacuum Cleaner performing at its best, make sure to clean the filter regularly. Follow these simple steps: - After removing the colored part from the bucket, take out the filter case by rotating it counterclockwise (image 7).
- Separate the foam filter from the filter case (image 8).
- Tap the foam filter and the filter case over a trash bin to clean (image 9).
- Rinse the colored part under the tap (image 10) and dry with a cloth (image 11).
- Rinse the foam filter (image 12) and squeeze it until clean water comes out (image 13). Remember not to rinse the filter case.
- Wait 24 hours until the foam filter is fully dried (image 14).
- Reassemble the parts (images 15-18).
تشغيل إيقاف مؤقت -
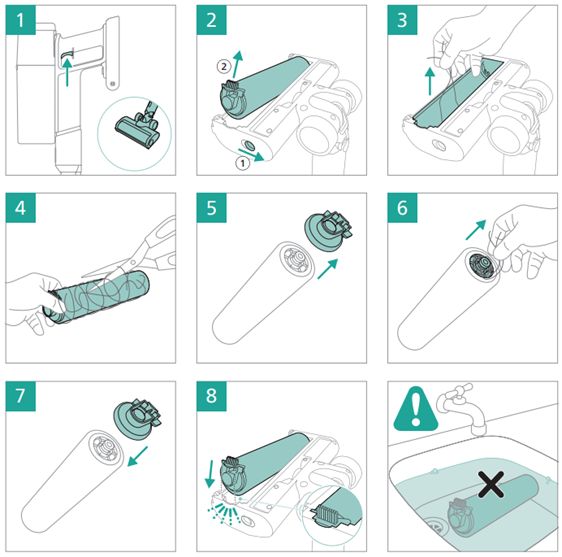
Your Philips Cordless Vacuum Cleaner has a rotating brush located inside the nozzle. This brush can become clogged with hair and needs regular maintenance. Please follow the steps below and refer to the video for more information: - Switch off the power (image 1).
- Remove the brush while holding the button to the right (image 2).
- Remove all visible pollution by hand (image 3)
- Cut and remove any tangled hairs from the brush (image 4).
- Remove the side cap (image 5) and remove hairs in between (image 6).
- Insert the brush back in place, and your vacuum is ready to use (images 7-8).
تشغيل إيقاف مؤقت -
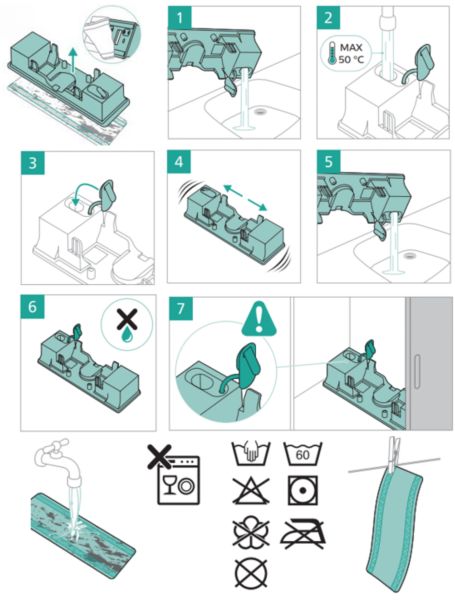
To keep your Aqua nozzle in good condition, we suggest following these easy steps for cleaning and drying after each use. Refer to the video for more information: - Remove the cloth from the water tank.
- Empty the water tank (image 1).
- Clean the water tank under the tap and shake it gently (images 2-5).
- Let the water tank dry and clean the cloth by rinsing it or putting it into the washing machine (images 6-7).
We recommend replacing the cloth every 6 months (accessory XV1630).
Note: The water tank in the video looks slightly different from your water tank, but the cleaning method is the same (1:36-1:46).
تشغيل إيقاف مؤقت
Contact Philips
